This is a step by step guide to set up CXF web service using Spring. I am taking an example of using MTOM to upload file. You can use similar setup for posting requests to the webservice. This would be the most comprehensive example to setup and test webservice on the web so far. The motivation to write this article came because I could not find a step by step guide to create a web service.
Installing Apache CXF
Go to Apache website (http://cxf.apache.org/download.html )and download the binary distribution.
Install it on your c: drive. I normally store it directly on my C:\ drive but you can nest it within some folder.
Install it on your c: drive. I normally store it directly on my C:\ drive but you can nest it within some folder.

Linking the CXF to Eclipse.
Go to Window->Preferences and navigate down to Web Services. Now link your downloaded CXF binary to Eclipse.If you want to use Spring, then you should also go to the Enpoint Config tab and check that "Use Spring Application Context" is selected. You could also use CXF Servlet. This example will use Spring Application Context since we will also integrate Spring.
While you are on this window you might want to browse across different tabs on "CXF 2.x Preferences", to get an idea of all that you can configure from here.
Install Tomcat 7.x if your eclipse does not already have one setup
Go to Apache Tomcat website ( http://tomcat.apache.org/download-70.cgi) and download binary for tomcat. I have it installed at C:\. You can install it at any sub folder.
Creating the web project and writing the web service
Create a new Dynamic Web Project, using File -> New
If you notice in this configuration, following properties have been set:-
- Project Name - whatever you want to call your project
- Target Runtime - this is the runtime env for your web server. If no runtime evn is available, you can click new runtime button and select new server runtime. Select Apache Tomcat 7, since this is the one that you have downloaded in the last step. Click next and give the path of the installation directory of your tomcat.
- Rest of the configuration on the Dynamic Web project window are as above.
- Click finish button to create a project
Your newly created web project looks like this
Now in the Java Resources > src folder, create a java class that will contain our file upload method. The class and content look like this.
The complete code for this web service impl is as follows:-
@MTOM
@WebService(targetNamespace = "http://impl.webservice.com/",
portName = "CXFWebServiceImplPort",
serviceName = "CXFWebServiceImplService")
public class CXFWebServiceImpl {
public String hello(String userText){
return "Hello "+ userText;
}
@WebMethod
@Oneway
public void dataUpload(
@XmlMimeType("application/octet-stream") DataHandler data)
{
System.out.println("Reached dataUpload");
try {
System.out.println(data.getInputStream().toString());
data.getInputStream().close();
System.out.println("dataUpload--> end");
} catch (Exception e) {
// TODO Auto-generated catch block
e.printStackTrace();
}
}
}
You see in the code above, that there are two methods:-
- hello - Simple web service method to recieve a String text and return back the response.
- dataUpload - This method is used to upload a file to the web service.
Create bottom up web service from this java class
Right click on the class and go to Web Service and select "Create Web service"
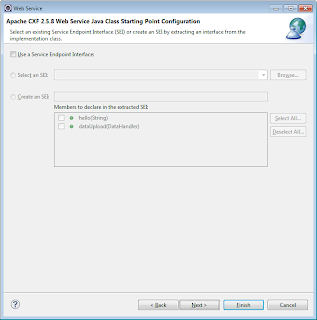
Web service pop up dialog will open. Configure the web service as per screen shots below.
Change the Web service runtime from Axis to Apache CXF 2.x since we are using CXF :)
No changes on this screen, click next
Since we had already annotated the dataUpload as @WebMethod, hence this comes selected in the window. You could have made that selection from here. No changes here. click next..
On this screen, select SOAP binding to SOAP 1.2. We do not want to use SOAP 1.1 anymore..
Click Finish.
Some classes and files would be generated. Tomcat would start itself. If the Tomcat starts and your files are generated, then you are good to go.
Your setup and web service is all done...
In the generated files, you might want to check the following.
In your wsdl file you will find the URL to the wsdl. It would be
You can test your web service by setting up SOAPUI project and providing this wsdl URL.
You can also write a JUnit Test case to test it.
Following is the code for the same:-
public class CXFWebserviceTestCase {
QName serviceName;
QName portName;
Service service;
com.dmi.cxfws.impl.CXFWebServiceImpl_PortType client;
@BeforeClass
public static void setUpBeforeClass() throws Exception {
}
@Before
public void setUp() throws Exception {
serviceName = new QName("http://impl.webservice.com/", "CXFWebServiceImplService");
portName = new QName("http://impl.webservice.com/", "CXFWebServiceImplPort");
service = Service.create(serviceName);
service.addPort(portName, SOAPBinding.SOAP12HTTP_MTOM_BINDING,"http://localhost:8080/webservicesample/services/CXFWebServiceImplPort?wsdl");
client = service.getPort(portName, com.webservice.impl.CXFWebServiceImpl_PortType.class);
}
@Test
public void test_uploadFile() {
DataHandler dh = new DataHandler(new FileDataSource("C:\\data\\in\\DS1.txt"));
client.dataUpload(dh);
System.out.println("client end....");
}
You can also setup the project as a Maven project, incase you are working on Maven and deploy is independent of Eclipse on Tomcat...
How to do that? Well, it seems you are getting lazy folks. That for some other day. Try out yourself..
And enjoy the web service implementation and do give your feed back...


This comment has been removed by the author.
ReplyDeleteVery good tutorial. Can you pls shed some light on what is com.dmi.cxfws.impl.CXFWebServiceImpl_PortType class in CXFWebserviceTestCase? I may be missing something here, i am unfortunately unable to use this class.
ReplyDeleteHi VallsUser, classes like .._PortType are generated from the WSDL in a webservice. You can generate these classes using wsimport tool or maven plugin like cxf-codegen-plugin
Deletehttp://cxf.apache.org/docs/maven-cxf-codegen-plugin-wsdl-to-java.html
Hi VallsUser, classes like .._PortType are generated from the WSDL in a webservice. You can generate these classes using wsimport tool or maven plugin like cxf-codegen-plugin
ReplyDeletehttp://cxf.apache.org/docs/maven-cxf-codegen-plugin-wsdl-to-java.html